Open an SSH terminal and cd to /srv/http
Sudo commands or sudo -i and act as root
In Firefox or Chrome go to https://165.xxx.yyy.242:8000/ or a specific assigned server to work on. This guide is for a single Ubuntu/NGINX setup as opposed to a multi server set up with separate MariaDB database server.
From the Ajent -V dashboard click “Websites” in left column menu.
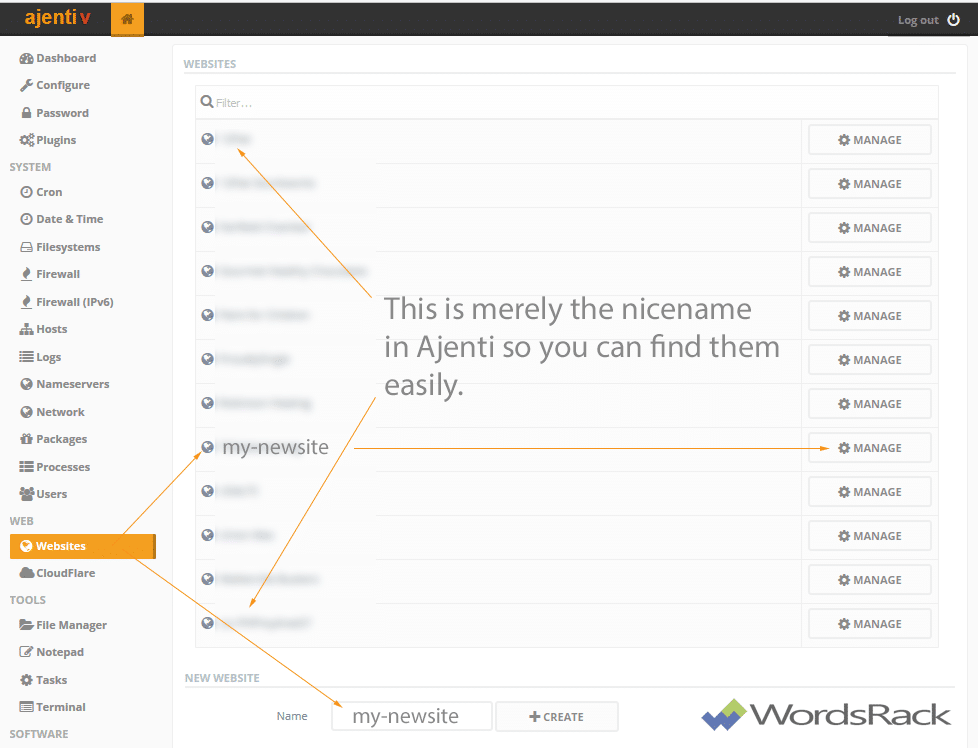
In center column inside “New Website” type site Identifier that will become folder in /srv/http i.e /srv/http/mynewsite and click +CREATE
The new Site name will populate immediately above on page.
Clicking “Websites” again in left sidebar menu will sort the sites alphabetically.
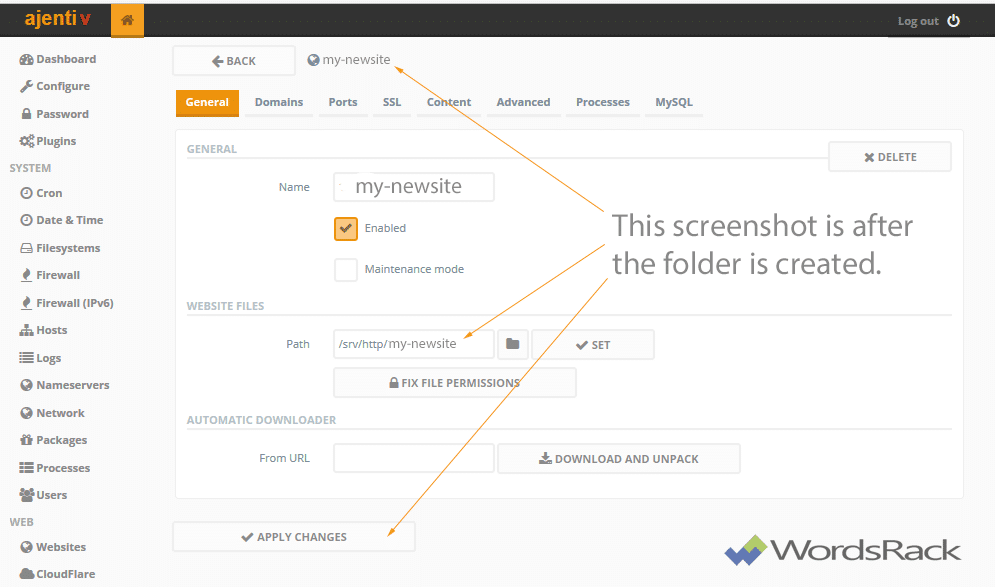
Click “Manage” on the site you just created. You will now be on the “General” tab, Ajenti -V for “Websites”

Uncheck “Maintenance Mode”
Type in path “/srv/http/my-newsite” to create folder on server and “set”. You can click “Fix File Permisssions” but we’ll be setting permissions again in the terminal for directories, files and ownership. Replace /my-newsite with your preferred name for the folder.
Now, click “Domains” and type in my-newsite.com (your actual tld url). This can be a sub-domain such as for development, i.e. dev.my-newsite.com. Apply changes.
Click “Ports” and overwrite 80 with 443 and click SSL since we are going to issue a certificate for encryption back to the origin server (that’s us).
Click SSL and were going to insert paths but still have to issue the certs (pem cert and privkey) for which we’ll use CloudFlare to generate. All Wordsrack plans have SSL back to the origin server and Railgun. Wordsrack is a certified Cloudflare partner.
We put a folder in /etc generally and you can create it where you want, generally owned by root with no outside write permissions.
So, for intent and purpose we create /etc/letmeencrypt/sitename and create 2 (empty) files for now in it one cert.pem and privkey.pem owned by root with 644 permissions.
Login to the Cloudflare account associated with the domain and click on the “Crypto” tab and select “Full (strict)”
Scroll down a bit and select “Create Certificate” Let Cloudflare create a private key and CSR, type RSA. Copy and paste those exact values, no spaces before or after into your files residing in /etc/letmencrypt/sitename – and copy the paths into Ajenti -V
/etc/letmencrypt/sitename/cert.pem and save (SSL certificate path). Do the same for /etc/letmencrypt/sitename/privkey.pem (SSL key path).Ok moving forward fast here, you see by now we can do this and the rest in under an hour, have WordPress and plugins / theme installed and deliver a new site in a browser before lunch.
Let’s go. The server has custom wp and nginx conf.d folders pre-populated with most directives and we just have to point a few things in that direction.
First create a FastCGI instance in “Content”. We’re back at the top of Ajenti -v control panel “Websites” on the site we just started configuring. Select “Content” and click the drop down selecting PHP FastCGI. URL pattern will stay Regex.
Now click/open PHP FPM and put “2” in Min processes and “30” in Max. These are not arbitrary but they are not cast in stone either. For RAM considerations for multiple site or single site machines will be discussed in another guide.
Now click/open PHP below FPM and we’ll put our basedir path: i.e. open_basedir = /srv/http/my-newsite.com:/tmp;
In “Advanced” (below PHP in “Content”) we’ll just click “Append URL pattern to path (root) and finally “Apply Changes”
NOW, go to the “Advanced” tab to the right of “Content” in Ajenti -v “Websites” (we haven’t actually moved but you may have taken a break and will get very familiar with the process from muscle memory the more sites you add and maybe even break a few things along the way but will learn intuitively how to correct them. Wordsrack Dedicated servers are fully managed and a technician (sysadmin) will be on standby if something goes wrong with your WordPress install. Other apps and html sites are not supported but welcome to be installed on any dedicated machine. You have 100GB SSD on the base plan which can house unlimited WordPress websites (ok when you exhaust 100GB of WordPress you’ll have a lot).
One of our clients has 50 (we’ll call modest WordPress installs) on a Carbon IT/Titanium machine and is up to 18.0GB. Each site consuming around 360MB on average with the database. That said you can put around 250 of those on one machine. With 250 sites on one machine you’ll probably want to buy upgraded RAM. Using ZEND (opcache), memcache and system memory/cache we recommend about 2GB per 30 sites.
The tab on the far right will be the last part of the Ajenti -v setup for the MariaDB (mysql drop in pre-configured on Carbon IT Wordsrack Dedicated Plans) (short of copying or uploading files) in these tabs.
Click “MySQL” – Type in a database name (we like to identify similar to the /folder name) so it’s readily apparent. No special charaters please, and click +CREATE.
Same for user/pass but let the tool create the password. We like some sort of consistency with the usernames across the sites like using identifiable initials just to mix it up so for my-newsite it would be something like mns6x02 (mns = my-newsite), makes sense. +CREATE and grant permissions / Apply Changes. All good now.
Moving into the WordPress install this is superfast since we have the 80GBps infinband Carbon backend networking.
If you want to upload WordPress and install plugins later you can save time too, but since Wordsrack has a premium suite of plugins for our shared clients we can copy the dozen or so standard and premium plugins and theme from another /wp-content folder into our new empty directory, go to the url (after a few more tweaks) and have a fresh install with a clean database.
Since what we have on our sample machine is already WordPress 4.7 with an existing site, we can copy the whole tamale of /wp-admin /wp-content and /wp-includes and all the root php files for WordPress to work.
Click “File Manager” in Ajenti -v left sidebar menu and go to /srv/http for the list of folders (wordpress installs) already there. For our purposes we have several domains in the file heirarchy and use the /srv/http/existingdomain.com folder. Just click at the top left of the structure where the checkmark is and it will select the entire WordPress install with the ownership and permission already set. (more later again, on that).
Click the “Copy” Icon at the top of the page and then click the http button (rendered above folders/files) and then click on the new domain folder. In there you will see the the clipboard contents waiting and just click the “Paste” icon at the top. At 80GBps you can say “Bob’s your Uncle” and switch pages and all the files will have been copied.
STOP
Immediately open the mysql tab at the top of “Websites” again for the new domain. Make a note … copy/paste the database name, username and password into a notepad or sticky note on your destop.
Go back to “File Manager” /srv/http/my-newsite.com and open the wp-config.php file and click “edit”. If WordPress to you is second nature you know exactly what to do.
a) insert database name
b) insert username
c) insert password
d) Change wp_ to something innocuous, i.e, mns_
e) You can set up the memory limits at the top and many other functions as well by “define”
i.e. define(‘WP_CACHE’, true); and define( ‘WP_MEMORY_LIMIT’, ‘128M’ ); debuggin and all the other things you’ve learned over the years about WordPress. On our dual server models we would replace “localhost” with the internal LAN ip for the MariaDB machine. Not applicable in this guide.You can also change the “Authentication Unique Keys and Salt” by overwriting them from newly generated ones from – https://api.wordpress.org/secret-key/1.1/salt/
IF we were installing WordPress from scratch, there are a few more steps. We’ve seen these forgotten in the past and it can break your install in certain instances.
Earlier we logged SSH into our terminal either directly from our Ubuntu laptop, or using Putty on a PC with the keys (PPK) provided to your by your administrator (Wordsrack) or for a user you created yourself.
You are or will “cd” to the directory (mandatory) of the new domain.
Change all folders (recursively) to 755 (this example) permissions with:
find . -type d -exec chmod 755 {} \;And all files in the whole structure to 644 with:
find . -type f -exec chmod 644 {} \;That’s quick and simple. Now the ownership. You have to remember this if you manually upload or build new files as they get assigned to root if you’re working in Ajenti -v and you really should have them owned by www-data.
Again it’s easy with:
sudo chown -R www-data:www-data /srv/http/my-newsite-folderThe -R forces the ownership recursively in the entire directory. Use lowercase and sorry, it won’t. that’s the nature of cli commands. Command Line Interface. Shoot us an emails ane we’ll arm you for bear in this specialized set up.
You can restart Mysql, php5-fpm and nginx now to spin it up. We have a few other NGINX directives for www and such but most importantly now, go to your cloudflare panel and set the A records for the domain and www to your new machines IP address and click the clouds to “orange”, effectively turning on the security, speed and encryption feature sets.


